
Most trailers do not die from hauling. They die from sitting. Water collects in the channel steel, salt spray packs into every weld, and by the time the frame looks rough on the outside it is often much worse inside the tubing. The usual fix, a can of black spray paint over the flaky spots, buys about one season.
Here is a process that holds up a lot longer.
Where trailer frames actually rust
- Inside tube steel. Rectangular tube frames trap moisture and rust from the inside out. You often will not see it until the wall is thin.
- Crossmembers, especially where they meet the main rails and where deck boards hold moisture against them.
- Spring hangers and axle mounts, which collect road grime and salt.
- The tongue and coupler area, which takes the most spray from the tow vehicle’s tires.
- Behind fenders and under the deck, where nobody looks.
Step 1: Get it clean
Pressure wash the whole frame, including the inside of channels. If you live where roads get salted, a degreaser and hot water helps. Let it dry completely, ideally a full day in the sun or in a heated shop.
Step 2: Remove loose rust
Your choice of tool depends on how far gone the frame is:
- Wire wheel on an angle grinder for light surface rust
- Flap discs or strip discs for scale and heavier rust
- Abrasive blasting for a full restoration, especially on older equipment trailers
You do not need to reach bright metal everywhere if you plan to use a rust converter, but you do need to remove everything loose and flaky. Coatings stick to what is underneath them, and loose rust is not a foundation.
Step 3: Treat what is left
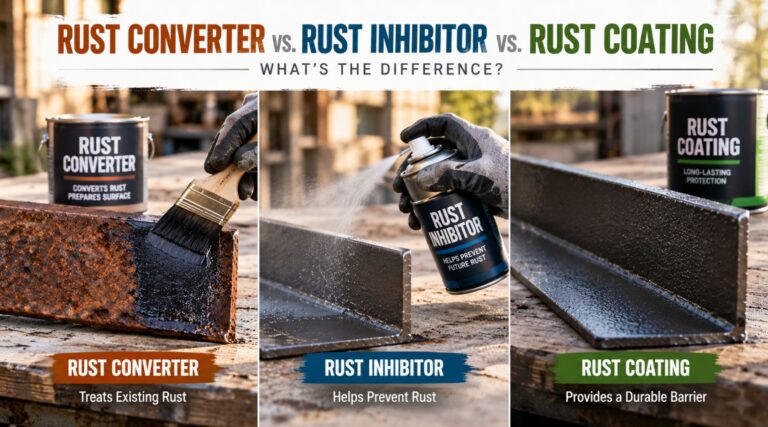
Pitted areas that still hold rust can be treated with a rust converter, which chemically changes iron oxide into a more stable compound that can be painted. We explain how converters differ from inhibitors and coatings in rust converter vs rust inhibitor vs rust coating. Follow the product’s dry time before primer.
Step 4: Prime
A good primer is where the corrosion protection really lives. Epoxy primers and zinc-rich primers are both popular for trailers. Hit the edges, welds and bolt holes with an extra brush coat. Those are the first places rust comes back.
Step 5: Topcoat or undercoat
For the visible frame, a durable topcoat in your color of choice. For the underside and inside surfaces, many owners go one step further:
- Rubberized undercoating adds a thick, sound-deadening, chip-resistant layer.
- Oil or wax-based rust inhibitors sprayed inside tubes creep into seams. They need reapplying, usually yearly, but they protect places a brush cannot reach.
- Spray polyurea on the frame and deck gives a very tough, thick coating that shrugs off gravel and cargo abuse.
ArmorThane’s page on trailer undercoating compares those options in more detail, and this guide to trailer bedliner coatings shows what a fully sprayed trailer looks like.
Do not forget the inside of the tubes
Drill small drain holes at low points if your frame does not have them, so water can get out. Then spray a creeping rust inhibitor in through existing holes or new access holes with an extension wand. This one step probably adds more life to a tube frame than anything else on this list.
Boat trailers are their own problem
Dunking a steel trailer in salt water is about the worst thing you can do to it. Galvanized or aluminum frames are the better starting point for saltwater use. Either way:
- Rinse the trailer thoroughly with fresh water after every launch, including the inside of the frame and the bunks.
- Check and repack wheel bearings often, or use bearing protectors.
- Touch up any scratch in galvanizing quickly with a zinc-rich paint.
Yearly maintenance
Once a year, wash the trailer, look for chips and fresh rust bloom, touch them up, and re-spray inside the tubes. Thirty minutes a year keeps a frame solid for a very long time.
Turn this into a business.
ArmorThane helps contractors and new owners get equipped, trained and spraying rust prevention coatings.